DaiShivas Mapview
You can download mapview right here:
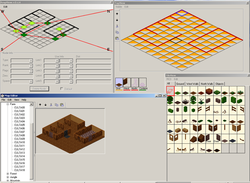
The General Window on Mapview has 4 sections.
1: Main Window - Has the "Map List" tree and large graphic window to show what a map looks like
2: RmpView -Shows the Spawn points for the map you have currently selected
3: Top View - Is where you place the Tiles onto the Map block, there is 4 sections - make sure you place objects in correct one ( for example Don't place a table in the "Floor" slot.
4: TileView - shows what tiles are loaded for use within the selected map block ( you can change this in the PATHS window ( press edit then Paths to open window)
Edit a Map Block
To add/remove Tiles to a map block , first select which map block you wish to change. Then select a item using a Left click on your mouse in the Tileview window . Now Switch back to the TopView window, there are four boxes on the bottom of this screen ( Floor, West ,North and Content) Select which location you will be adding the desired tile to, then Pick the location on the map grid you where you want to place it, then Right Clicking on your mouse will add it that location.
To delete a item from TopView window you can select the delete option from the Tileview window OR double right click on a item you wish to clear ( Make sure you select what content you are selecting again , its impossible to delete the floor tile if you still have content selected). Once your map is setup the way you desire you are ready to move onto Spawn Nodes
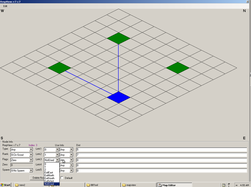
On the RmpView Window and Right click where you want your first node to be placed. It is important to note that these nodes are used to spawn Units and allow them to walk between map blocks. Once you have placed a few Nodes Link them together ( See Link1 -5 on the image) and to each edge of the battle map so Aliens can walk onto the map from all directions. At this point you can specify what units will use this node, can anyone walk along this path , maybe you just want flying units to use it, the choice is yours . NOTE: If you want an Alien to move from NODE A to NODE B , then you need to make sure the 2 Nodes are linked, Once the alien is at NODE B, If you want him to walk back to NODE A , you need a separate link on Node B back to Node A as otherwise you are only setting up a one way path.
Once i have set up my nodes around my map i usually change a desired amount to spawn points and WHO can spawn at these points. You will note the 5 options on the bottom left of the RmpView window, TYPE , Rank, Flag, Zero and Spawn.
Type - What kind of unit will use this node . The options are Any, Flying ,Flying Large, Large or small units ( Accordfing to Daiky there is no Flying Large- its a error in mapview)
Rank - Who will spawn here , Xcom agents, Civilians ,Alien Leader or soldier ?
Spawn - Do you wish a unit to spawn here ( You will note there are several options here, just dont ask me why , i always pick 1)
Flag - ???
Zero - ???
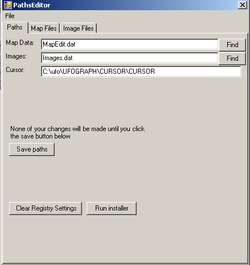
Path Editor
On the main window, click on the EDIT button and select PATH. When this opens there are 3 main Tabs:
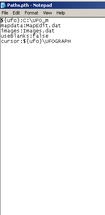
1: PATH : Tells you where Map editor is storing the Mapedit.dat file and Image.dat files . ( Be warned some version of map view Wipes these files so always make backups before entering path editor)
2: Map Files : Has Map list tree and allows you to moddify what Tile set ( .MCD/.PCK/.TAB) are used on what map blocks.
3: Has a list of all the current Tiles sets loaded into Map view ( Warning , Do not add new Tile sets through this screen , in my experience it always wipes your data , instead open the Image.Dat file in notepad to add any new Tile sets)
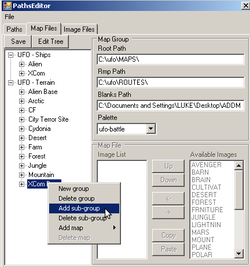
The Map File Tab within the Path Editor is where all the fun happens. Here you can create NEW groups for your map files , Create new maps into them ( using the Add Map drop down box) and then tell Mapview what Tile lists you want to use on these map .
* To Create new groupings OR add new or existing Map sets just Right Click on the Map List Tree and select the desired options
* To Add or Remove Tilesets to a map block, First select the map file you wish to change, then ( on the bottom right of the screen) Move Tile Types between the 2 boxes ( image list OR Available Images ). NOTE: The Sequence of which you have the tiles added to your map block is important also dont forget to Save your changes before you leave this screen.
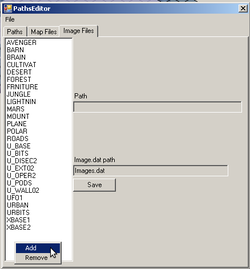
The Image File Screen is where you should be able to add or remove Tile Types from mapview. Personally i have never found a copy of mapview where this worked correctly so i hand modify this file . However looking at the layout it should be as easy as Right click on the Image File Tree, selecting Add or Remove and pressing save.
Mapviews configuration files
Some versions of mapview have a few errors in them that pop up when your creating new map or adding new Tile sets, as such before you try anything new in your version of mapview i recommend you backup these files. If you find that your version of the software just wont work , open on of these files up and try to add the data manually.
The 4 Configuration files are :
1:Paths.Pth - stores the location of the xcom game to be used plus the name of the other configuration files ( Basically this Looks like the first "PATHS" tab )
2: MySettings.Dat - stores all your window layouts and stuff
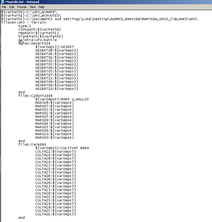
3:Mapedit.Dat - Has your " Map list " tree and all there settings stored within it. ( This is the data for the "Map Files" Tab)
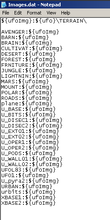
4:Image.Dat- Stores all the Tiles sets data ( This is the data for the "Image Files" Tab).
NOTE: IF you create your own Tileset ( or you borrow someone else's) you will first need to add the Tile sets Name into the Image.dat file , then you need to add them to your maps "Image List" via the Mapedit.Dat file OR through the Mapview "Map Files " Tab.
Known Problems: Mapview was not set up for Openxcom, it was created to make new maps for the original xcom games. As such in original xcom there was a limit to the number of Objects you could have on a battle scape ( 256 I think it was). As such you cant have a set of maps use more than this as you will find that you will build your map, save it, but when you come back next time half your images have changed to other objects. To get around this you need to build your own Tilesets for the map block set you are working on ( instead of just adding 7 sets to your one map list), This is easily done by using MCDADD to create new sets by copying other data and PCKVIEW to change the graphic to what ever object you want.
Known Problems: Mapview was not set up for Openxcom, it was created to make new maps for the original xcom games. As such in original xcom there was a limit to the number of Objects you could have on a battle scape ( 256 I think it was). As such you cant have a set of maps use more than this as you will find that you will build your map, save it, but when you come back next time half your images have changed to other objects. To get around this you need to build your own Tilesets for the map block set you are working on ( instead of just adding 7 sets to your one map list), This is easily done by using MCDADD to create new sets by copying other data and PCKVIEW to change the graphic to what ever object you want.
